This is default featured post 1 title

Go to Blogger edit html and find these sentences.Now replace these sentences with your own descriptions.This theme is Bloggerized by Lasantha Bandara - Premiumbloggertemplates.com.

This is default featured post 2 title

Go to Blogger edit html and find these sentences.Now replace these sentences with your own descriptions.This theme is Bloggerized by Lasantha Bandara - Premiumbloggertemplates.com.

This is default featured post 3 title

Go to Blogger edit html and find these sentences.Now replace these sentences with your own descriptions.This theme is Bloggerized by Lasantha Bandara - Premiumbloggertemplates.com.

This is default featured post 4 title

Go to Blogger edit html and find these sentences.Now replace these sentences with your own descriptions.This theme is Bloggerized by Lasantha Bandara - Premiumbloggertemplates.com.

This is default featured post 5 title

Go to Blogger edit html and find these sentences.Now replace these sentences with your own descriptions.This theme is Bloggerized by Lasantha Bandara - Premiumbloggertemplates.com.

This is default featured post 6 title

Go to Blogger edit html and find these sentences.Now replace these sentences with your own descriptions.This theme is Bloggerized by Lasantha Bandara - Premiumbloggertemplates.com.

This is default featured post 7 title

Go to Blogger edit html and find these sentences.Now replace these sentences with your own descriptions.This theme is Bloggerized by Lasantha Bandara - Premiumbloggertemplates.com.

Minggu, 07 April 2013

IDS Twitter update 6 april 2013

Ini Update IDS twitter 7 April 2013
 Sebelumnya minta tolong follow twitterku yaa @mahfud_esm ,,makasih :)

jangan lupa follow dulu twitterku @mahfud_esm ...
langsung ajh nie IDS project terbaru saya selamat mencoba


spicybeast39:JBXMWDDIFXserbatahu*idfb*com
ignorantforesig:VWOSPFNLSV
juvenileundercu:ESCMSGIHCPserbatahu*idfb*com
spuriousnugget8:KJIZZPLLTW
spiffyalley59:EEPZBCNXLE
rhetoricalassis:UYFYAQCTTW
abruptace9:GYTFRLHNMI
furtivewrinkle4:ADKJLKZGXI
ruthlessimbecil:NJBZDLNHEH
kinddormitory10:KBUEUSGNJQ
squeamisheffect:serbatahu*idfb*comDSHLWRVJQR
nappyelation72:FLZVTOKPHZ
grouchynerve24:FHLFXHNRXH
workabledinner6:BPJOMOISUKserbatahu*idfb*com
abidingkeeper8:PEGITYHNMH
cumsquad1:thebotnet
shra1dhar@ymail.com:ys2b74md1t
dhiraj@studioreves.com:namrata
omnicaninfo@gmail.com:nikhilkill
shra1dhar@ymail.com:ys2b74md1t
serbatahu287na63563833@yahoo.com:serbatahuidfbcom78784
talkin_sportgopons46534@yahoo.com:serbatahuidfbcom9987
_serbatahu65qwidfbcom5496235@yahoo.com:_serbatahuidfbcom_23
_serbatahu45eidfbcom78554137@yahoo.com:_serbatahuidfbcom_23
_3serbatahu8793widfbcom21343369@yahoo.com:_serbatahuidfbcom_23
_serbatahu76qwidfbcom44522609@yahoo.com:_serbatahuidfbcom_23
_serbatahu76eidfbcom45206127@yahoo.com:_serbatahuidfbcom_23
_1serbatahu875qwidfbcom905443369@yahoo.com:_serbatahuidfbcom_23
_4serbatahu5642qwidfbcom437280401@yahoo.com:_serbatahuidfbcom_23
_5serbatahu4526qidfbcom124580401@yahoo.com:_serbatahuidfbcom_23
donlacoste67@yahoo.com:lacoste
neama@hotmail.com:nour7abibi
annaevans54@yahoo.co.uk:SAPPHIRE29
__serbatahu45esaidfbcom78553550@gmail.com:serbatahu_idfb_com341

Ini Update IDS twitter 7 April 2013
 Sebelumnya minta tolong follow twitterku yaa @mahfud_esm ,,makasih :)


IDS Twitter terbaru 7 april 2013

Ini Update IDS twitter 7 April 2013
 Sebelumnya minta tolong follow twitterku yaa @mahfud_esm ,,makasih :)

jangan lupa follow dulu twitterku @mahfud_esm

Madit1843426372:pADjjLkIDHP
Agus798495069:bKKploFhCgl
Ady950664828:ljcGiGaciBN
Rey1323868549:qAojIPDNMHa
Amam214040147:hnfmDaEELhD
Terry456978517:qHjmlAmEjbK
Iman1697636730:nAeGhPKEiOP
Ikhsan920246556:bgdhldoFkJd
Troy1196900827:lbOkMeigKpK
Tuan1550443775:DFgPPdaBNdO
Rheza1053963908:EEKIckejBCD
Chico1194029192:CFfLCkjOGNC
Antari529722896:EqkGKmLKNhn
Tono42886459:kjFfmogoILi
Vidy1068072084:PdkCkGmmKAa
Aldo1306428276:pEDnKfmaEnC
Tina605772601:dDCnfpgnpoP
Krisna33146552:HDjiMIndDpo
Gitar983355681:CofHOGMmNEB
Falcao476512252:qfhdBlKafbp
Deny1155648939:iLCbGIjHINn
Astra1413676368:MKCemDEcNPb
Adika219777397:IhPOgpkpeEk
Kira1499563276:aMjNMNoEjLb
Rian1160856507:BbPINjHFbpF
Tukul159134984:JOHnNahokdc
Catur714884469:abbdLglGldo
Catur1711818830:pOKPLKAohnL
Zainal686833705:IkiaLefLLPc
Badrun921939145:cipKdnNKoPm
Rudi1793858379:GgCNFOOiBcA
Eno366754025:dPcDiFlBfDb
Nico1388797897:HhIeDahHEFd
Abu1780319325:hOKBHnpcPLd
Tian178311378:bmpjqICCBMI
Bejo1341749620:DbhgPMCGbhn
Tono1018497690:ieKPLFBbkId
Yaseer410633599:NjigjhMPDnI
Putra705697999:HOmACkmBPeq
Rick300792850:bPoHOiGJOko
Junian696440961:DpfKOeGiqqj
Egaf839009571:PHnhMpFnPDn
Taslim887300819:JOMLiqcGFNq
Upin1275457511:mdCojBPngJL
Falcao138353238:OhHqfeNjmci
Tio984805262:aopcbNmbKcb
Abi1270959795:bEnfoicBMdF
Sukadi234780074:fcBIDnkmfpG
Bangun172205143:MCmMHaOMBOq
Asma880941014:FbKOLplBBCL
Cucok983639044:DGqBOIhCIkd
Madam1801292168:kjfEkLdhjef
Seger1336648136:gbdgjccKGaa
Rey960498491:IgIhEHInIbN
Sadri1590109949:iNqdabIcEaJ
Thariq430292407:dhGlcodNkmB
Naldi610187665:mimqLoqkgha
Hulk622500080:HeaNqMHAhDd
Juan1060683601:AqdibbJjjqL
Boby1509949132:HFnheDJgFDm
Asep1401033963:keccoAkgaaA
Gibbs1195897261:EoBlpJpoJqk
Daus429017358:DnfiHCfDhaE
Yunos638015843:ldJlgDBBnbp
Catur1313159603:kqCGilcPDLj
Irwan156698200:FIpJFnlCGqK
Bangun149773815:nbnAhAgGhja
Edison660925060:qOoBqfKpaPA
Kendi1224322451:DFEogMGDeBf
Edison615195202:ECgHLcjblMF
Takur245143536:DfIiHEhkfGf
Tomy604229491:KOBOBahCBMM
Aldo965439559:oboBhekihai
Anton95421966:nPamDCpaONB
Gani74707114:jemgAnfaGMB
Alfi1050278483:djpmMmkMEqP
Kendi1764635538:ABPiPipjacP
Muamba404685122:OJiCKiOhKEk
Tono1232525256:ioaHLGaOlcB
Muamba863906746:ANAOoNljCnk


Dorothy.Blanchard25@yopmail.com:eYbsvY40
Scott.Hess14@yopmail.com:l7WUvwRH
Cheryl.Phelps45@yopmail.com:2PX0YnwW
Georgina.Stephenson45@yopmail.com:20Xrq5MO
John.Morse8@yopmail.com:JKEEH6VV
Rickey.Sweeney4@yopmail.com:EvSQj6Nh
Patrice.Foreman43@yopmail.com:0t3LMw4H
Jessie.Morales12@yopmail.com:Of2RWjOt
Geraldine.Briggs42@yopmail.com:yggJntl7
May.Odonnell33@yopmail.com:onwwixrv
Pasquale.Mccarthy4@yopmail.com:DwQWbkf5
Pauline.Garcia35@yopmail.com:pYUyqHjC
Georgia.Wyatt49@yopmail.com:7uA0C6B0
Harry.Bush6@yopmail.com:GTxRVrKF
Barney.James5@yopmail.com:F4MYyRjr
Lynette.Snyder42@yopmail.com:yno6kdfM
Curt.Harris2@yopmail.com:Bo6hgDcm
Joel.Moran17@yopmail.com:TgSUPnmp
Howard.Young22@yopmail.com:aT6e6J3K
Nettie.Wood43@yopmail.com:zt0sqNp0
Emily.Myers39@yopmail.com:uZHKubAs
Yvonne.Robbins38@yopmail.com:uilQxpXm
Kelly.Giles9@yopmail.com:Kh7kL2XR
Karen.Russo36@yopmail.com:rCX5k0bh
Silvia.Nguyen35@yopmail.com:qntFEazL
Lorene.Allen44@yopmail.com:0pxuoJ0q
Dorothy.Powers27@yopmail.com:gFR1KvMH
Vincent.Andrews2@yopmail.com:BZM4Ihhy
Wilfred.Avery12@yopmail.com:Oti3p5dx
Micah.Mullins8@yopmail.com:JdVAK2Mx
Stacy.Young31@yopmail.com:kcn1vG27
Joni.Patrick47@yopmail.com:40Kv1sqm
Chet.Finley17@yopmail.com:U1qxvwYA
Norma.Ray33@yopmail.com:ncEQpidH
Joseph.Mccormick9@yopmail.com:KEZmsnnY
Wm.Macias6@yopmail.com:GkVQn2zq
Marie.Castro36@yopmail.com:qMbiRmGu
Nathaniel.Thompson23@yopmail.com:bjsXlKgr
Harvey.Cain10@yopmail.com:Lez0fpvd
Kristin.Reed35@yopmail.com:qi1EHPVR
Jamaal.Macias6@yopmail.com:H0gIB0zM
Christopher.Gray21@yopmail.com:YOMy2WaV
Sharon.Pugh42@yopmail.com:yElmR0UN
William.Cameron25@yopmail.com:dJOLd0BJ
Ruben.Hernandez11@yopmail.com:McrHNL4k
Joshua.Leonard34@yopmail.com:oCc4jqYk
Harvey.Gray23@yopmail.com:bjzPzWhh
Kelly.Allen33@yopmail.com:nWvNsD0O
Derrick.Schwartz15@yopmail.com:SjiMPkk0
Sean.Salazar10@yopmail.com:LfEEirSS
Helen.Garrison42@yopmail.com:zAaFu7DT
Daren.Stein31@yopmail.com:l77g1Beo

Kamis, 27 Desember 2012

Membuat Apple

1. Tentunya Corel telah terbuka dan new document telah terbuat, lalu buatlah objek seperti gambar di bawah ini.
object apel
Warnai dengan Interactive Fill Tool, merah dan merah hati, kalaupun mau warna hijau ya warnailah hijau muda dan hijau tua, karena di sini saya menggunakan warna merah jadi saya akan terus menggunakan warna merah ini.

2. Ok, setidaknya kita sudah memiliki apel yang lumayanlah, kemudian buatlah object seperti di bawah ini : 
draft apel
Untuk memberikan kesan bahwa itu melengkung, hahaha… Lalu warnai objek tersebut dengan menggunakan merah muda sekali, clik dan tahan pada Color Palette warna maka akan keluar New Pallete Windows seperti gambar di bawah ini.

New Pallete Windows
Pilih yang paling muda. Kemudian dengan menggunakan Interactive Tranperancy Tool, transparansikan bagian atas objec tadi seperti pada gambar di bawah ini.

Interactive Tranperancy Tool

3. Setelah langkah di atas, copy objec apel kemudian warnai merah tua banget atau agar lebih mudah, warnai saja hitam.
copy objec apel
Kemudian klik Interactive Transperancy Tool, ubah Transperancy Type ke Radial 


Kemudian klik pada Icon Edit Transperancy yang berada di sebelah kiri Transperancy Type tadi, setelah di klik tentunya akan muncul jendela baru seperti gambar di bawah ini
Edit Transperancy
Kemudian klik pada Icon Edit Transperancy yang berada di sebelah kiri Transperancy Type tadi, setelah di klik tentunya akan muncul jendela baru seperti gambar di bawah ini :

Pilih Custom seperti yang saya lingkari merah pada gambar di atas, lalu klik dua kali pada Fountain preview untuk membuat node seperti yang saya lingkari biru pada gambar di atas, lalu kembali ke objek, ubah posisi Transperancynya seperti pada gambar di bawah ini


Kemudian centerkan pada objek apel sebelumnya.


4. Selesai? Belum ladies and gentleman…. Masih terlalu jauh untuk berhenti… Sekarang buatlah dua objek oval seperti pada gambar di bawah ini.

Besar kecil seperti gambar di atas, letakkan sama persis seperti gambar di atas, warnai oval besar dengan warna yang sama dengan warna apel, merah. Warnai objek oval kecil dengan merah tua, setua-tuanya. Lalu klik Interactive Blend Tool


Kemuadian klik Objek Oval Kecil lalu tarik sampai snap ke objek oval besar, jika benar, maka jadinya akan seperti gambar di bawah ini.

Lalu letakkan objek yang telah kita blend ini di atas apel, seperti pada gambar di bawah ini.


5. Kemudian kita akan membuat rantingnya. Buatlah objek seperti gambar di bawah ini.

Dengan menggunakan Bezier Tool atau FreeHand Tool, tergantung kebiasaan saja. Lalu warnai Merah Tua seperti warna Objek Oval Kecil tadi sehingga terlihat seperti tidak berpotongan atau menyatu.


Seleksi objek tersebut lalu klik Mesh Fill Tool
Mesh Fill Tool
Maka akan terjadi perubahan pada objek tersebut seperti pada gambar di bawah ini.


Lalu seleksi node-node yang berada di kiri objek, lalu berilah warna lebih sedikit terang.


6. Okeee… Sebenarnya sudah jadi APEL seperti ini. 
buah apel
Jika ingin menambahkan daun, bisa membuat daun lalu gunakan Mesh Fill Tool untuk mewarnainya

Mungkin memang kurang jelas, tapi di sini saya menekankan fungsi dari tool-tool yang digunakan di tutorial ini. Berikut hasil jadi dari saya
buah apple
Demikian proses pembuatan Apple. Sekedar iseng di tengah-tengah pekerjaan, hehe… Terima kasih dan semoga bermanfaat. 
Anda juga bisa membaca tips sebelum membeli ID CARD Printer atau disebut juga Tips mesin pencetak ID CARD

Membuat LOGO windows 8

Selamat Natal dan Tahun Baru 2013. Pada tutorial corelDraw kali ini penulis akan membahas bagaimanacara membuat logo dari Sistem Operasi Windows yang terbaru dari Microsoft yaitu Windows 8. Dilihat dari logonya yaitu Simple namun Elegan dan eye catcing, itulah pengalaman yang ingin Microsoft berikan pada sistem Oprasional Windows 8. Lain halnya dengan windows sebelumnya yaitu windows 7 dan Windows Vista, maka kali ini menurut saya Logo di Windows 8 agak sedikit keluar dari pakem dengan tampilannya yang serba kotak - kotak seperti kolase (Tile) namun tetap Logonya elegan dan Fresh

Cara Membuat Logo Windows 8

Ok bagaimana cara membuatnya? mari kita membuat logo Windows 8 dengan Corel

1. Buka aplikasi corel, kali ini penulis memakai Corel X5 namun tutorial ini bisa diaplikasikan ke semua jenis program coreldraw.
Klik File >> New (Ctrl + N) , klik Ok. maka akan muncul lembar kerja untuk pembuatan logo Windows 8


2. Buat kotak dengan Rectangle Tool (F6)
Rectangle Tool
Setelah itu tekan CTRL + Q untuk mengubah kotak yang kita buat menjadi Garis Kurva (Convert To Curves), yaitu bangun yang terdiri dari titik - titik curva sehingga bisa kita modifikasi point - point kurvanya. Gunakan Shape Tool (F10) lalu klik kiri pada kurva kemudia tahan dan geser kurva untuk menDrag (Memindahkan posisi Kurva) 
Convert To Curves
dan kita akan namai ini kotak windows 8 


3. Setelah itu kita buat lagi kotak persegi panjang yang memotong secara horisontal tepat di tengah tengah logo Windows 8

dan akan kita namai kotak tersebut kotak pemisah horisontal 


4. Sekarang klik kiri Kotak pemisah horisontal lalu tahan tombol shift pada keyboard kemudian klik kotak windows 8
Setelah itu klik Trim untuk memotong

Dan akhirnya kotak windows 8 terbelah menjadi 2 bagian. Lanjut kakak...!!! oke makin seru kan... 


5. Ok sekarang tinggal kita potong Kotak Windows 8 secara vertikal (atas - bawah). Caranya kakak? hehe..
Klik 2x kotak pemisah windows sehingga keluar tanda putaran dan putar 90 derajat 

ulangi seperti pemotongan sebelumnya yaitu klik kiri Kotak pemisah horisontal lalu tahan tombol shiftpada keyboard kemudian klik kotak windows 8
Setelah itu klik Trim untuk memotong secara vertikal dan Yahoo kita mempunyai logo Widows 8. Klik kotak pemotong dan tekan Del (untuk menghapus) - "habis manis sepah dibuang nih ceritanya... malang benar nasibnya kotak pemotong", oke lanjut ya


6. warnai sesuka kalian, Caranya klik logo windows lalu klik kiri warna yang disuka pada pallete color kemudian klik kanan pallete color silang (tanpa warna) untuk menghilangkan outline pada logo windows 8, Hasilnya:
logo windows 8
Beri background yang menarik, misal gradasi antara warna biru dan putih
windows 8 wallpaper

Minggu, 15 April 2012

From the Browser to the Page: Resources for Web Designers Dabbling in Print

I would guess that, today, more people are entering the broader world of design through web design than any other facet of the larger spectrum. In large part, this is likely due to the accessibility of the web. It’s right there in front of us, and most of us probably spend at least a few minutes (if not hours) on it every single day.
It’s also relatively easy to get started with designing for the web (which is not to say that it’s easy). I started creating my first sites with Windows Notepad and a freeware copy of Paint Shop Pro. It’s certainly not the most ideal setup, and if I was starting again, I would probably be using Gimp and some sort of freeware coding app. Regardless, web design is relatively immediate, and while there are many different areas that need to be considered, there is still the sense that we are very much in control of what we are doing.
Designing for print is a bit of a different story. First, while we can do a lot of work in Photoshop (and probably Gimp too), somehow this kind of design feels somewhat more inaccessible. That’s not to say that it’s difficult or complicated, but rather that it’s probably not something that as many people would just sit down and start doing because they’re bored and sitting at their computer one evening. Designing for print is generally much more intentional and purposeful.
It’s also at least somewhat out of our hands. While web seems to offer us complete control over our work (this, of course, is debatable), when designing for print you must invariably trust your artwork in the hands of someone else—unless, of course, you’re a printer yourself—and there are a wide range of different things that need to be considered.
All that being said, however, it is certainly not outside the realm of possibility that, as a web designer, you may be asked to try your hand at print design from time to time. Well have no fear, this post is here to help prepare you for that eventuality. Below, you will find a collection of articles specifically chosen to help web designers who are making their first venture into the world of printed matter.
CMYK printing

Covering the Basics

If you’re just getting started, the best place to start is probably to cover the basics of designing for print. This includes understanding DPI, bleeds, CMYK colour, the difference between plain black and rich (true) black and a variety of other important concepts. Here are a few articles to help cover the basics here:

Is Your Artwork Ready for Print?

A short little piece that covers some of the most basic elements of getting your artwork ready for print, such as colour space, resolution and bleed/trim areas. Works great as a simple introduction to designing for print.

How To Set Up Files For Printing

This is a similar article to the previous, with just a bit of a different perspective. It also briefly touches on a few extra areas, such as the importance of deadlines and packaging files. Just be aware that the discussion of black focuses primarily on text, not on larger areas of black.

Design Guide for Print

Here is yet another brief article to help you prepare your artwork for print. Again, some of the same ideas are repeated, but this one has a very nice discussion about the importance of plain black for text rather than four colour, processed black.

Getting to Know RGB and CMYK

This article focuses on some of the key important concepts surround both the RGB and CMYK colour spaces, and covers some things that you need to consider when converting and image from RGB to CMYK.

More Than Just Black

This article will help explain the critical difference between plain, single colour black and rich, processed black, helping you avoid the disappointment of getting your printed piece back and finding faded, dark grey where you expected a deep black.
InDesign

Mastering InDesign

If you have one of the recent Adobe suites that includes Photoshop and Illustrator, there is a pretty good chance that you may also have InDesign sitting somewhere on your harddrive too. Perhaps you’ve never opened it, or perhaps you have and were simply unable to make an real sense of it.
Well, while it shares some similarities with Illustrator, it is not a native vector application. It is a page layout application—exactly the kind of software package that we need for creating beautiful books, magazines, leaflets and other printed matter. And, while it is certainly not the only application of its kind (its main competition is Quark), it remains my application of choice, primarily because it comes bundled with my other Adobe products.
The thing that I like about InDesign over another application, like Photoshop, is that it is specifically engineered to help designers create work for the printed page. As such, it allows you to create multi-page documents, and set options for bleeds, slugs, crop marks and so on. It also contains a huge and versatile set of typographic tools that make Photoshop’s character and paragraph palettes very limited in comparison.
So, for many web designers, InDesign may be the natural page layout application to turn to. To help in this area, SpyreStudios has an extensive seven part series called “Getting To Grips With In Design,” which covers most of the key areas of the application. Reading through these will offer a very solid foundation for InDesign:

Magazine Cover Design in InDesign

After having come to grips with InDesign with the SpyreStudios series, here is an awesome tutorial about how to create a simple magazine cover in InDesign. this is a perfect opportunity to put what you’ve learned to use. It’s also written by Terry White, a really great Adobe instructor (I’ve personally attended one of his seminars).
typography

Pre Press

Now that we’ve covered the basics of setting up your artwork for print and started down the path to learning page layout, we can start looking at some tips and requirements for going through the prepress stage, and actually getting designed artwork ready to send off to the printer.

Printing & Prepress Basics

This is a nice little article that covers some of the things that you need to do to prepare your artwork in the prepress stage. By this point, some of the content will be familiar to you, but there is a nice little discussion of the concept of trapping, along with the uses of registration marks and colour bars for the printing process.

Preparing InDesign Files for your Print Service

This is just a short little piece about how to actually prepare your InDesign files in a single package that you can send off to the printer, using the application’s Package functionality. It’s a nice little time saver that is definitely worth knowing and this article functions a simple and straightforward introduction.

Prepress tips for graphic designers

Even if you’ve covered all the basics that you would have learned from many of the previous cited articles, there are still some tiny but important details that will need to be considered before actually going to press. This article works as a kind of checklist of a number of other things that you will want to address or consider before going to press. The topics here are directed more at a somewhat experienced print designer, so its probably not the best article to start with, but is definitely a valuable resource that you might want to bookmark.

Minimizing Annoying Font Problems During Print

Here’s an article that I wrote a few weeks ago, dealing specifically with font issues and print. It covers some basic things that you can do to help minimize font issues when sending artwork off to the printer. If you check this one out, also be sure to read the comments, as there is some helpful discussion there too.

Selasa, 10 April 2012

10 Contoh Kemasan Unik

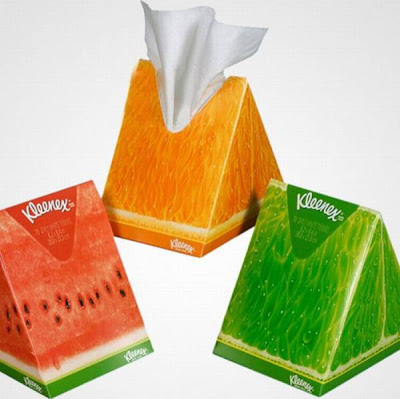
Contoh kemasan unik sebagai ide jasa desain packaging unik dan menarik untuk meningkatkan penjualan produk Anda. Telah dibuktikan melalui riset di Amerika, Indonesia, Jepang dan negara lainnya bahwa kemasan unik dan menarik dapat mendongkrak penjualan produk. Packaging atau lebih dikenal sebagai kemasan merupakan wadah atau sarana pembungkus mempunyai fungsi ganda. Selain dapat membantu mencegah atau mengurangi kerusakan disaat distribusi barang juga sangat berperan dalam menentukan keputusan konsumen untuk melihat atau bahkan membeli produk tersebut. Fungsi untama melindungi kemasan dari bahaya pencemaran serta gangguan fisik berupa gesekan, serangan binatang, benturan, perubahan udara / cuaca ringan dan juga getaran.
Kemasan unik banyak dipakai di Indonesia akhir-akhir ini. Ada kotak kemasan ada yang bentuk brick dan ada yang nyeleneh dengan bentuk tak beraturan. Karena mereka paham bahwa dengan mempercantik kemasan dapat meningkatkan daya saing produk. Apalagi bagi mereka yang menjual produk makanan dan oleh oleh khas daerah tertentu. Kemasan makanan unik menjadi daya pikat yang manjur bagi calon pembeli bahkan yang tidak kenal produk tersebut sebelumnya. Jika kesan pertama produk sudah menyenangkan, lucu dan dapat meraih hati calon pembeli barulah sisi rasa dan selera yang menentukan. Kemasan produk keren, kemasan bagus akan menarik para pelanggan dan kustomer potensi.
Fungsi utama pacaging atau pengemasan sebenarnya untuk menempatkan produk hasil pengolahan atau produk industri sehingga proses angkut, simpan, dan kirim produk mudah dilakukan sekaligus menghemat tempat. Ada pula yang mengesampingkan fungsi hemat tempat ini. Alasan utamanya adalah untuk menonjolkan identitas atau lebih keren dikenal dengan sebutan bran sekaligus menarik pembeli yang menyukai bentuk kemasan unik dan artistik.
Mari kita bahas dari segi promosi dan branding. Wadah atau pembungkus produk cukup berperan dalam merangsang atau daya tarik niat pembeli untuk segera menentukan pilihan produk yang dibeli. Kita wajib ingat bahwa produk yang dijual di etalase toko akan bersaing dengan produk lain bahkan serupa. Mulai dari rasa yang sama, produk, bentuk dan bahan. Peran kemasan semakin menentukan.
Mungkin Anda akan tertarik dengan tulisan berikut
  1. Tips membuat brosur yang tepat guna
  2. Membuat desain brosur dengan photoshop
  3. Cara bikin desain brosur dengan coreldraw
  4. Cara membuat desain brosur dengan illustrator
  5. 10 Contoh Desain Brosur Makanan yang Menarik
Beda kasus pada etalase pribadi / toko monopoli yang hanya menjual produk itu saja. Kemasan unik dan menarik akan memberikan rasa nyaman dan senang kepada customer ketika melihat kemasan terlihat menarik bahkan elegan dan mewah. Naiklah prestige pembeli. Coba Anda bandingkan pada contoh kasus kripik ketela. Mungkin Anda sudah tahu ada keripik ketela yang dijual di etalase mini market atau swalayan. Bandingkan dengan keripik singkong yang dijual di pinggir jalan. Biasanya menyediakan rasa manis, asin dan bawang. Jika kita telaah sedikit lebih jauh pada proses produksi. Maka akan ditemukan fakta unik, yaitu harga produksi kripik ketela lebih mahal yang dijual di pinggir jalan, yang tanpa kemasan.
Misalkan satu ons kedua keripik tersebut dijual dengan harga yang sama. Makakeuntungan yang menggunakan kemasan lebih besar karena produksi yang lebih murah. Dengan adanya fakta ini maka dapat dikatakan bahwa dengan memakai kemasan yang lebih baik maka dapat meningkatkan harga dan sekaligus meningkatkan keuntunganpernjual per piece nya. Apa lagi jika ditambah dengan peningkatan penjualan. Anda dapat membyangkan sebesar apa keuntungan yang Anda dapatkan menggunakan packaging unik dan menarik ini.
Akhirnya dapat ditarik kesimpulan. Ada tiga alasan utama mengapa desain kemasanpenting dalam pemasaran :
1. Desain packaging dapat membentuk pola loyalitas konsumen dengan cara mempengaruhi psikologis dan emosional. Contohnya melalui warna, keunikan bentuk kemasan, ilustrasi dan layout.
2. Desain kemasan juga dapat sangat berpengaruh terhadap standar perusahaan dalam penetapan harga sebuah produk diluar produksi.
3. Desain packaging dapat membuat sebuah produk mempunyai identitas yang membuatnya berbeda diantara produk lainnya sejalan dengan persaingan merk dagang yang semakin kompetitif
Contoh Kemasan Unik
p>Contoh Kemasan Unik
Contoh Kemasan Unik
Contoh Kemasan Unik
Kemasan Unik
Contoh Kemasan Unik
Kemasan Unik

Netpreneur Blog Indonesia

Share

Twitter Delicious Facebook Digg Stumbleupon Favorites More